July 21, 2013

Enos Kellogg Barn Restoration - Overview of the Project

For anyone who is interested, I thought that I would post a brief overview of what restoring our c.1784 barn will actually entail.  For the sake of clarity, I will break out the work by each of the three barn bays.
 
For those who don't know, timber framed barns are divided into bays, which are the areas between each bent.  A bent is a portion of the barn frame that consists of two or more vertical posts, joined together at the top  by a horizontal tie beam or girt.  When you picture a barn raising, you probably picture a bent being lifted up.  This scene from the movie Witness (which, by the way, is an awesome movie, ranking in my Harrison Ford hierarchy behind only the Star Wars and Raiders trilogies [sorry, I know that there were four Indiana Jones movies, but I prefer to live in a world where Kingdom of the Crystal Skull does not exist] should give you an idea of what I mean.


Raising a bent in Witness

Our barn, like most traditional Connecticut barns of the 18th century, is comprised of four bents and three bays.  The center bay was used for threshing grain. As such it would have had a wood floor to provide a clean, hard surface for threshing (see picture at right).  While our floor is long gone, one floor support and a handful of joist mortises in an original ground sill provide evidence of its original design.  We are restoring the threshing floor to its original configuration based on this evidence. 
 
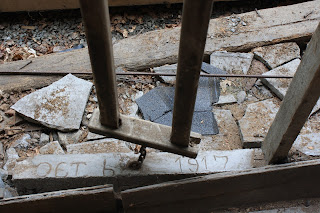
One side bay (the west bay, in our barn) was the animal bay, used for housing cattle and sometimes other animals.  We know which side was the animal bay in our barn by the presence of three cattle doors at the west gable end of the barn, and by the cattle stanchions (used to hold a cow's head during milking) that remain in place in our barn.  The third bay (the east bay on our barn) was the mow, used for storing hay and other animal fodder.
 
Cattle Stanchion
 

OK, with that digression out of the way, herewith is what needs to happen on our barn:
 
 
East (Mow) Bay (this is where the barn had suffered the most over the years, with decay, water damage and some serious hurt from the pine tree that fell on it during Super Storm Sandy last year)
  • Replace northeast corner post with new hewn white oak post
  • Tenon repair on mid post
  • Tenon repair on southeast corner post
  • Replace 30' tie beam with new hewn white oak post
  • Replace rotted, broken and missing nailers with white oak salvaged from rafters
  • Replace all ground sills with milled white oak
  • Replace all roof plates with milled hemlock
Center (Threshing) Bay
  • Tenon repair on northeast post
  • Replace rotted bottom of southwest post with oak salvaged from east bay
  • Tenon repair on centereast post
  • Replace southeast post with new hewn white oak post
  • Replace missing centerwest post with new hewn white oak post
  • Replace missing nailers with white oak salvaged from rafters
  • Replace all ground sills with milled white oak
  • Replace all roof plates with milled hemlock
  • Install new swinging doors on north and south sides of barn using 60" forged iron strap hinges and pintles
West (Animal) Bay
  • Likely tenon repair on northwest post
  • Likely tenon repair on southwest post
  • Tenon repair on tie-beam
  • Replace missing nailers with white oak salvaged from rafters
  • Replace all ground sills with milled white oak
  • Replace all roof plates with milled hemlock
Throughout Barn
  • Replace all missing or damaged bracing
  • Replace all siding with shiplapped, wide plank tongue-and-groove boards over rough sawn boards
  • Replace all rafters, restoring roof profile to original 12:12 pitch
  • Install metal roof over 12" rough cut boards (sadly we can't afford to put up cedar shingles) 
  • Install wide plank floor, with necessary supports and joists
  • Rebuild dry-laid fieldstone foundation

Wow, that's a hell of a lot of work for 2 months.  The overriding philosophy is to save as much of the original fabric of the barn as possible, and to restore the barn to its appearance c.1784, using appropriate materials, tools, and techniques, with particular attention paid to replicating the joinery methodologies employed when the structure was originally built.  Wish us luck.

July 14, 2013

Restoring the Enos Kellogg Barn

At last!  Restoration work on the Enos Kellogg Barn is finally under way.
 
While we had been able to nurse our much-neglected 18th century barn along since purchasing the property in 2001, a chance meeting with a giant white pine tree during Super Storm Sandy last October left us with the choice of either undertaking a major restoration project or risking the collapse of the structure.


Front View, Pre-Restoration
Back View, Pre-Restoration


While simple economics might have argued for the latter course of action, we simply couldn't stomach the thought of seeing the old barn give up the ghost on our watch.  So, with some advice from the Connecticut Trust for Historic Preservation (which runs an amazing barn preservation program), we set out last fall to find someone to bring our barn back to life.  Trying to juggle finding the right person to do the work, negotiating with our insurance company over the Sandy damage, applying for a barn stabilization grant, and scraping up enough of our own funds to get the project going was not particularly fun.  Among the lowlights were having the first timber framer that we talked to flake out on the project right before it was scheduled to begin, and getting turned down for the barn grant due to a lack of funding for privately owned structures.

 
Happily, however, our barn mojo has improved dramatically in the past month.  First, we caught an exceptionally lucky break when one of the timber framers that the CT Trust had recommended most highly had an unexpected opening in his schedule due to the postponement of another job.  So, Renard Thompson and his crew (Lyla, Sam and Ben) were able to start work only a week after coming out to do a full evaluation of the structure in mid-June.


Renard is a walking encyclopedia of timber framing, having done beautiful restorations of many timber frame structures around Connecticut (take a look at his website - Bring Back Barns).  In the two-and-a-half weeks that they have been on site, I have learned a ton about timber framing, in general, and our barn, in particular.  Most interesting for me is confirmation that the barn is located on its original site (and not moved from somewhere else), and was constructed using tools and construction techniques consistent with the 1780s.  So, in all probability, this barn is the original barn associated with our home, and it likely was built either concurrently with our house, or very shortly thereafter  This makes its restoration all the more important in my eyes - we are extremely lucky to have both the original house and barn still standing as survivors after 230 years, and I see it as our duty to do what we can to help them endure for a few more centuries.
 
Our second lucky break came when we were trying find a source for white oak.  Our barn was originally constructed almost entirely of this species of wood, which is ideal given its strength and rot resistance.  Unfortunately, our project required quite a lot of new wood, most importantly to replace the rotted ground sills throughout the structure, and three particularly large pieces of oak  to replace other posts and beams that were not salvageable.  What I learned quickly is that big lengths of white oak are hard to find and are very expensive.  Luckily, it occurred to me that our friend Clint Thorn might know of a good source.  Clint is a master furniture maker, specializing in reproductions of some of the most beautiful pieces of furniture made in 18th century New England (check out his business The Open Talon).  He harvests much of the wood for his projects right from his own farm.  He, his wife, Kim, and their two sons live in Goshen, CT, on an idyllic farm that also houses their dairy operation (including cheese making and the crafting of amazingly delicious artisanal chocolates - check out their Thorncrest Farm & Dairy website).  Unbeknownst to me, they also had started a wood mill on their farm, and what material did they have available?  White oak!  And for a very attractive price.  As I said, our barn luck clearly had improved.

So, with a team of  experienced timber framing experts and a source for wood, our restoration is moving along.  So far, the crew has removed the majority of the roof, taken down the eastern bent of the barn where there was significant damage from the tree, poured new foundation piers for the eastern bay of the barn and prepared new sills and roof plates for that bay.  They also have almost finished hewing a corner post for the northeast corner of the barn, which will replace the post that was broken by the falling tree.  More details to come as the project progresses, but here are an array of photos of what has taken place so far.


Timmmmmbbberrrr!

Note: This is a post that has been sitting in my draft folder since spring, waiting until I uploaded photos, which didn't happen until today.


There was a small logging camp set up at the Enos Kellogg Homestead this week, as we finally bit the bullet and had a bunch of trees on the property taken down. 
 
Cedar tree being prepared for removal
About a dozen guys swept through our yard, dropping six trees and doing significant clean-up work on another four or five.


Ready to drop the top on the cedar
 
 
Some of the tree work was attributable to Super Storm Sandy, which, in addition to smashing our barn, snapped a huge Hemlock (who knew - I always thought that it was a pine) at the back of the property and left an enormous Larch tree ominously tilted towards the old stone carriage house across the street.  Sandy also broke off limbs on a few big Maples on the property, and made me reevaluate the two big Cedar trees that hung over our kitchen (and swayed violently during the storm).
 
While we were addressing the storm-related tree damage, we also decided to remove two sizable Norway Maples on the property, one of which was crowding out a smaller but much nicer Sugar Maple adjacent to our barn, and the second of which was just plain ugly, in addition to blocking the sunlight from our side yard.  As another "might as well" decision, I had them remove the many dead limbs from another Hemlock in the back yard, and grind up the remaining huge chunks of poison ivy-covered logs that represented the final vestiges of storm damage from three years ago.
 
Hemlock fall, go boom.


Particularly given my distaste for heights, it was amazing to witness the tree crew scamper up each tree (with chainsaws dangling behind them), denude the tree in about 5 minutes, and then topple 6-10 foot lengths of trunk one after another until the remaining trunk was small enough (20-30 feet) to drop safely into the yard.
 
Limbing up a Norway Maple

 
The cleanup was equally impressive, with the branches and non-fireplace-friendly wood all rapidly fed into a chipper, and the  maple cut into suitable lengths for me to split later. 
 
While I hate spending money on things like tree removal, and am sad to see some of the beautiful old specimens disappear, I will sleep a lot better during storms knowing that our trees are not likely to go crashing into our house or our neighbor's stone building.  The yard also looks sunnier and more open (and closer to what it was like in the 18th and 19th centuries).  I'm sure I'll appreciate the sun when I'm out in the yard with a splitter and a stump grinder in the spring.